Check out this blog on another way to store fabric. I thought this was pretty cool!
http://sewmanyways.blogspot.com/2012/01/tool-time-tuesdayfile-your-fabric.html
Tools I like to use to make my job easier
Check out this blog on another way to store fabric. I thought this was pretty cool!
http://sewmanyways.blogspot.com/2012/01/tool-time-tuesdayfile-your-fabric.html
One of the problems that longarm quilters face is when a customer brings their own batting and backing. Customers may not understand why they need to provide so much more fabric for the backing and also for the batting – I will show you why. Personally I request a minimum of 6 inches more in length and width. In other words, if the quilt is 72 inches x 80 inches, I will request that they provide both batting and backing that is at least 78 inches x 86 inches. I’d rather have 4 or more inches more on each side, which would be at least another 8 inches from the quilt top measurements. In this case, the batting and backing would need to be at least 80 inches x 86 inches. I provide batting and backing for the customer, and it’s always better for me to do this so that I don’t have to worry about issues that may come up.
The reason we want you, the customer, to provide us with extra batting and backing is this.

You can’t really see all the roller bars, but that black pole that you see with my cheater clips is one of the rollers (those white clips on the black pole help me make sure I am rolling the quilt stop straight – they are lined up to the border seams). I have 3 roller bars on my machine’s table. You would think that they would roll all 3 layers (top, batting, and backing) at the same rate… but, they don’t. Those rollers seem to suck up the backing and the batting much more than they do the top.
Let me show you an example, using a magazine.


As you look at this rolled up magazine, you will see that the front of the magazine (the top layer) does not meet the back of the magazine (bottom layer on a quilting machine, which would be the backing). In fact, this letter size magazine has the top rolled up part extending about an inch beyond the bottom. In between the 2 are the pages (batting) of the magazine. If you can get that much difference on that small a piece, imagine what happens when you have a quilt top that is 72 inches x 80 inches. You need a lot more batting and backing than you do for the quilt top.
So, here is my dilemma. I picked up a charity quilt to work on that had the batting and backing included. I measured before I put it all on the machine and feared the worst because I didn’t think there was enough extra batting and backing. When you lay them all out on the table, they look fine, like you have plenty of batting and backing. I told myself I was just being paranoid and that, surely, I could do this. I’d just be careful.
Well, this is what happened.

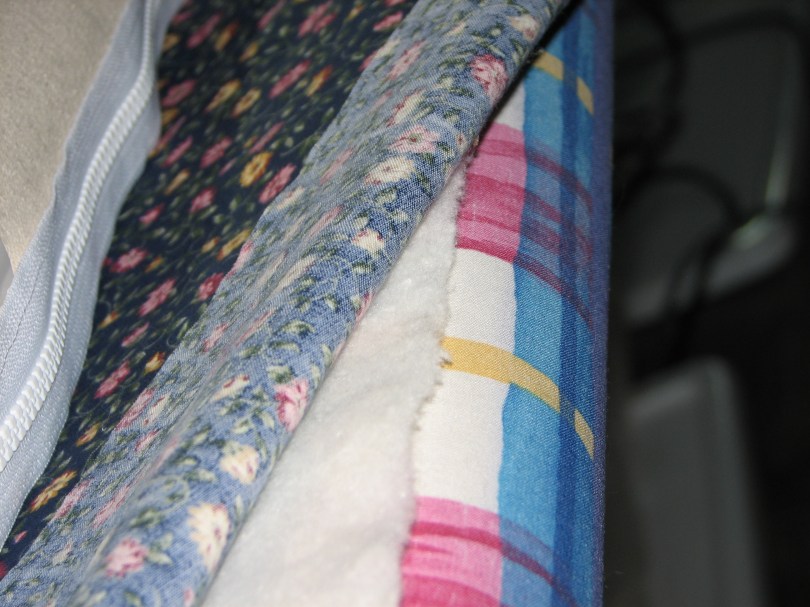
As you can see, the batting came up too short. I folded the flowery, quilt top fabric back, so you can see that there is not enough batting for this quilt. I am VERY lucky on this one, because I thought the backing would be too short as well. I barely have enough backing – it’s the rose and blue plaid. If you come up short on the backing, you basically have to take the quilt off and sew extra fabric onto the back and then re-attach it to the table/frame, etc. I can’t tell you how relieved I am not to have to do that!!!
I can fix the issue of batting much easier. There are 2 ways I can deal with this, and I’m curious as to which way YOU would fix it. That navy blue fabric with the pink flowers is the border of the quilt.

I stitched in the ditch all around the border and used an allover design for the body of the quilt. So, one of the things I could do to add batting would be simply to remove the batting already in the border area beyond the stitch in the ditch. I’d cut a piece of batting to butt up against the stitch in the ditch and then enclose it by stitching along the edge and quilting it with the border quilting design (big flowery design). OR… I could just cut about 2 more inches of batting the length of the batting already there and just continue on my merry way.
Either way, my concern is whether or not there will be a gap where I’ve added batting. In other words, will there be a gap next to the stitch in the ditch if I choose that option? Or, will there be a “no batting gap” in the middle of that border where the battings would meet? Certainly I can whip stitch the 2 battings together where they butt up against each other. But, I’d really only be able to do that if they meet in the middle of the border. Butting a solid piece up against the stitch in the ditch could be less noticeable and less work, but will the batting migrate away from that seam?
What would YOU do?
I ike this idea in Rosemary’s blog and thought it was worth a share…
http://quiltsbyrosemary.blogspot.com/2011/06/marking-quilting-pattern-using-pressn.html
The quilting is done and all I need to do now is add the binding before sending this quilt back to its owner. But, before I do the binding, I want to “block” it to make sure it will lay flat and square. I’ve heard that once you block a quilt, it will always be square, but I don’t know about that. Have any of you heard that?
So, here goes the blocking and how I do it. There are many strategies for blocking, but I’ve found that using a laser square is the easiest for me. First I lay out the quilt onto a surface that I can pin into – that would be my design wall placed on the floor. I forgot to tell you that I get the quilt wet first and run it through the spin cycle in the washing machine and then air fluff it so that it’s not soaking wet; just damp enough to nudge the fibers around.
I start at opposite corners and try to make sure those corners are fairly square and then do the other 2 opposite corners. This is just to get them in the ball park area, because you are going to be doing some nudging and things will shift. I then work from the middle out – I start with the middle blocks and make sure they are as square as possible, putting a few pins in there to hold the blocks in place while I work outward.

You can barely see the orange beam of light along the blocks’ edges, but you can see where the laser square is on the right side of the picture. Look for a horizontal beam and a vertical beam.
Sometimes as I am working along a seam line, the beam gets blocked by a pin or the quilt sticking up a bit in an area. In that case I run my finger along the beam to help me nudge the fabric into line.

When I’ve got the blocks where I want them, I then start with the inner borders and make sure they are square, sticking more pins along the lines to hold them in place.

And then I move to the inside edge of the outer border. Yes, more pins!

And then, finally, the outside perimeter of the quilt… I stick the most pins along these edges and will many times I will go back and remove some of the pins that are inside, especially those around the blocks and sashing. The quilt is where I want it at this point, and it will just be laying there.

When I’ve got it all pinned in place, I finger press down the edges to get it completely flat and then let it dry for a couple of days. This is a good reason to have a place that will be undisturbed. Oh, and I have a fan or 2 blowing air on it to help it dry. Then, it will be ready for binding.
So, if you have a laser square tucked away somewhere in your garage or in your husband’s tools, borrow it some time to see if this strategy is easier for you, too!
