Warning! For those of us who are longarm quilters or who want to be longarm quilters, read on… otherwise, this will bore you.Read More »
Category: Cool Tools
Tools I like to use to make my job easier
Free Blog Graphics
Ever hear of the Graphics Fairy? She offers free vintage graphics of all kinds at http://www.graphicsfairy-diy.com/ and http://www.graphicsfairy-diy.com/.
Well, now you can also get free blog graphics at http://the-blog-fairy.blogspot.com/. She will even show you how to load the graphics if you have Blogger. Did you notice the theme on my blog changed? She just started this, so she doesn’t have much yet, but I’m sure she will soon.
You can also get free backgrounds for your blog from the Graphics Fairy at http://www.backgroundfairy.com/. She does have more to choose from right now, but she’s been at it awhile. Head on over to take a look!
Marking a Quilt
I know most quilters mark designs onto quilts, and I mark my own quilts all the time. But, I am always afraid to mark on customers’ quilts. So, I have been trying to find alternate methods of getting a design onto a quilt. Remember the Press ‘n Seal method? You have probably already tried the following strategies. I have, too, but it’s been awhile since I’ve tried them, so they are new to me yet again. One strategy I tried on Mickey’s quilt last week was to bring my laser light to the front of my machine instead of using it in the back for pantographs. You can see how I drew her dog onto the quilt. On the left is the picture of her dog in black and white. I took a green highlighter and marked on the paper what I wanted to draw onto the quilt. Can you see the little red dot under the dog’s paw? That’s the laser light that is attached to the front of the machine. When I move the laser light along where I highlighted, I will be drawing with thread onto the quilt. You can see the finished product on the right.

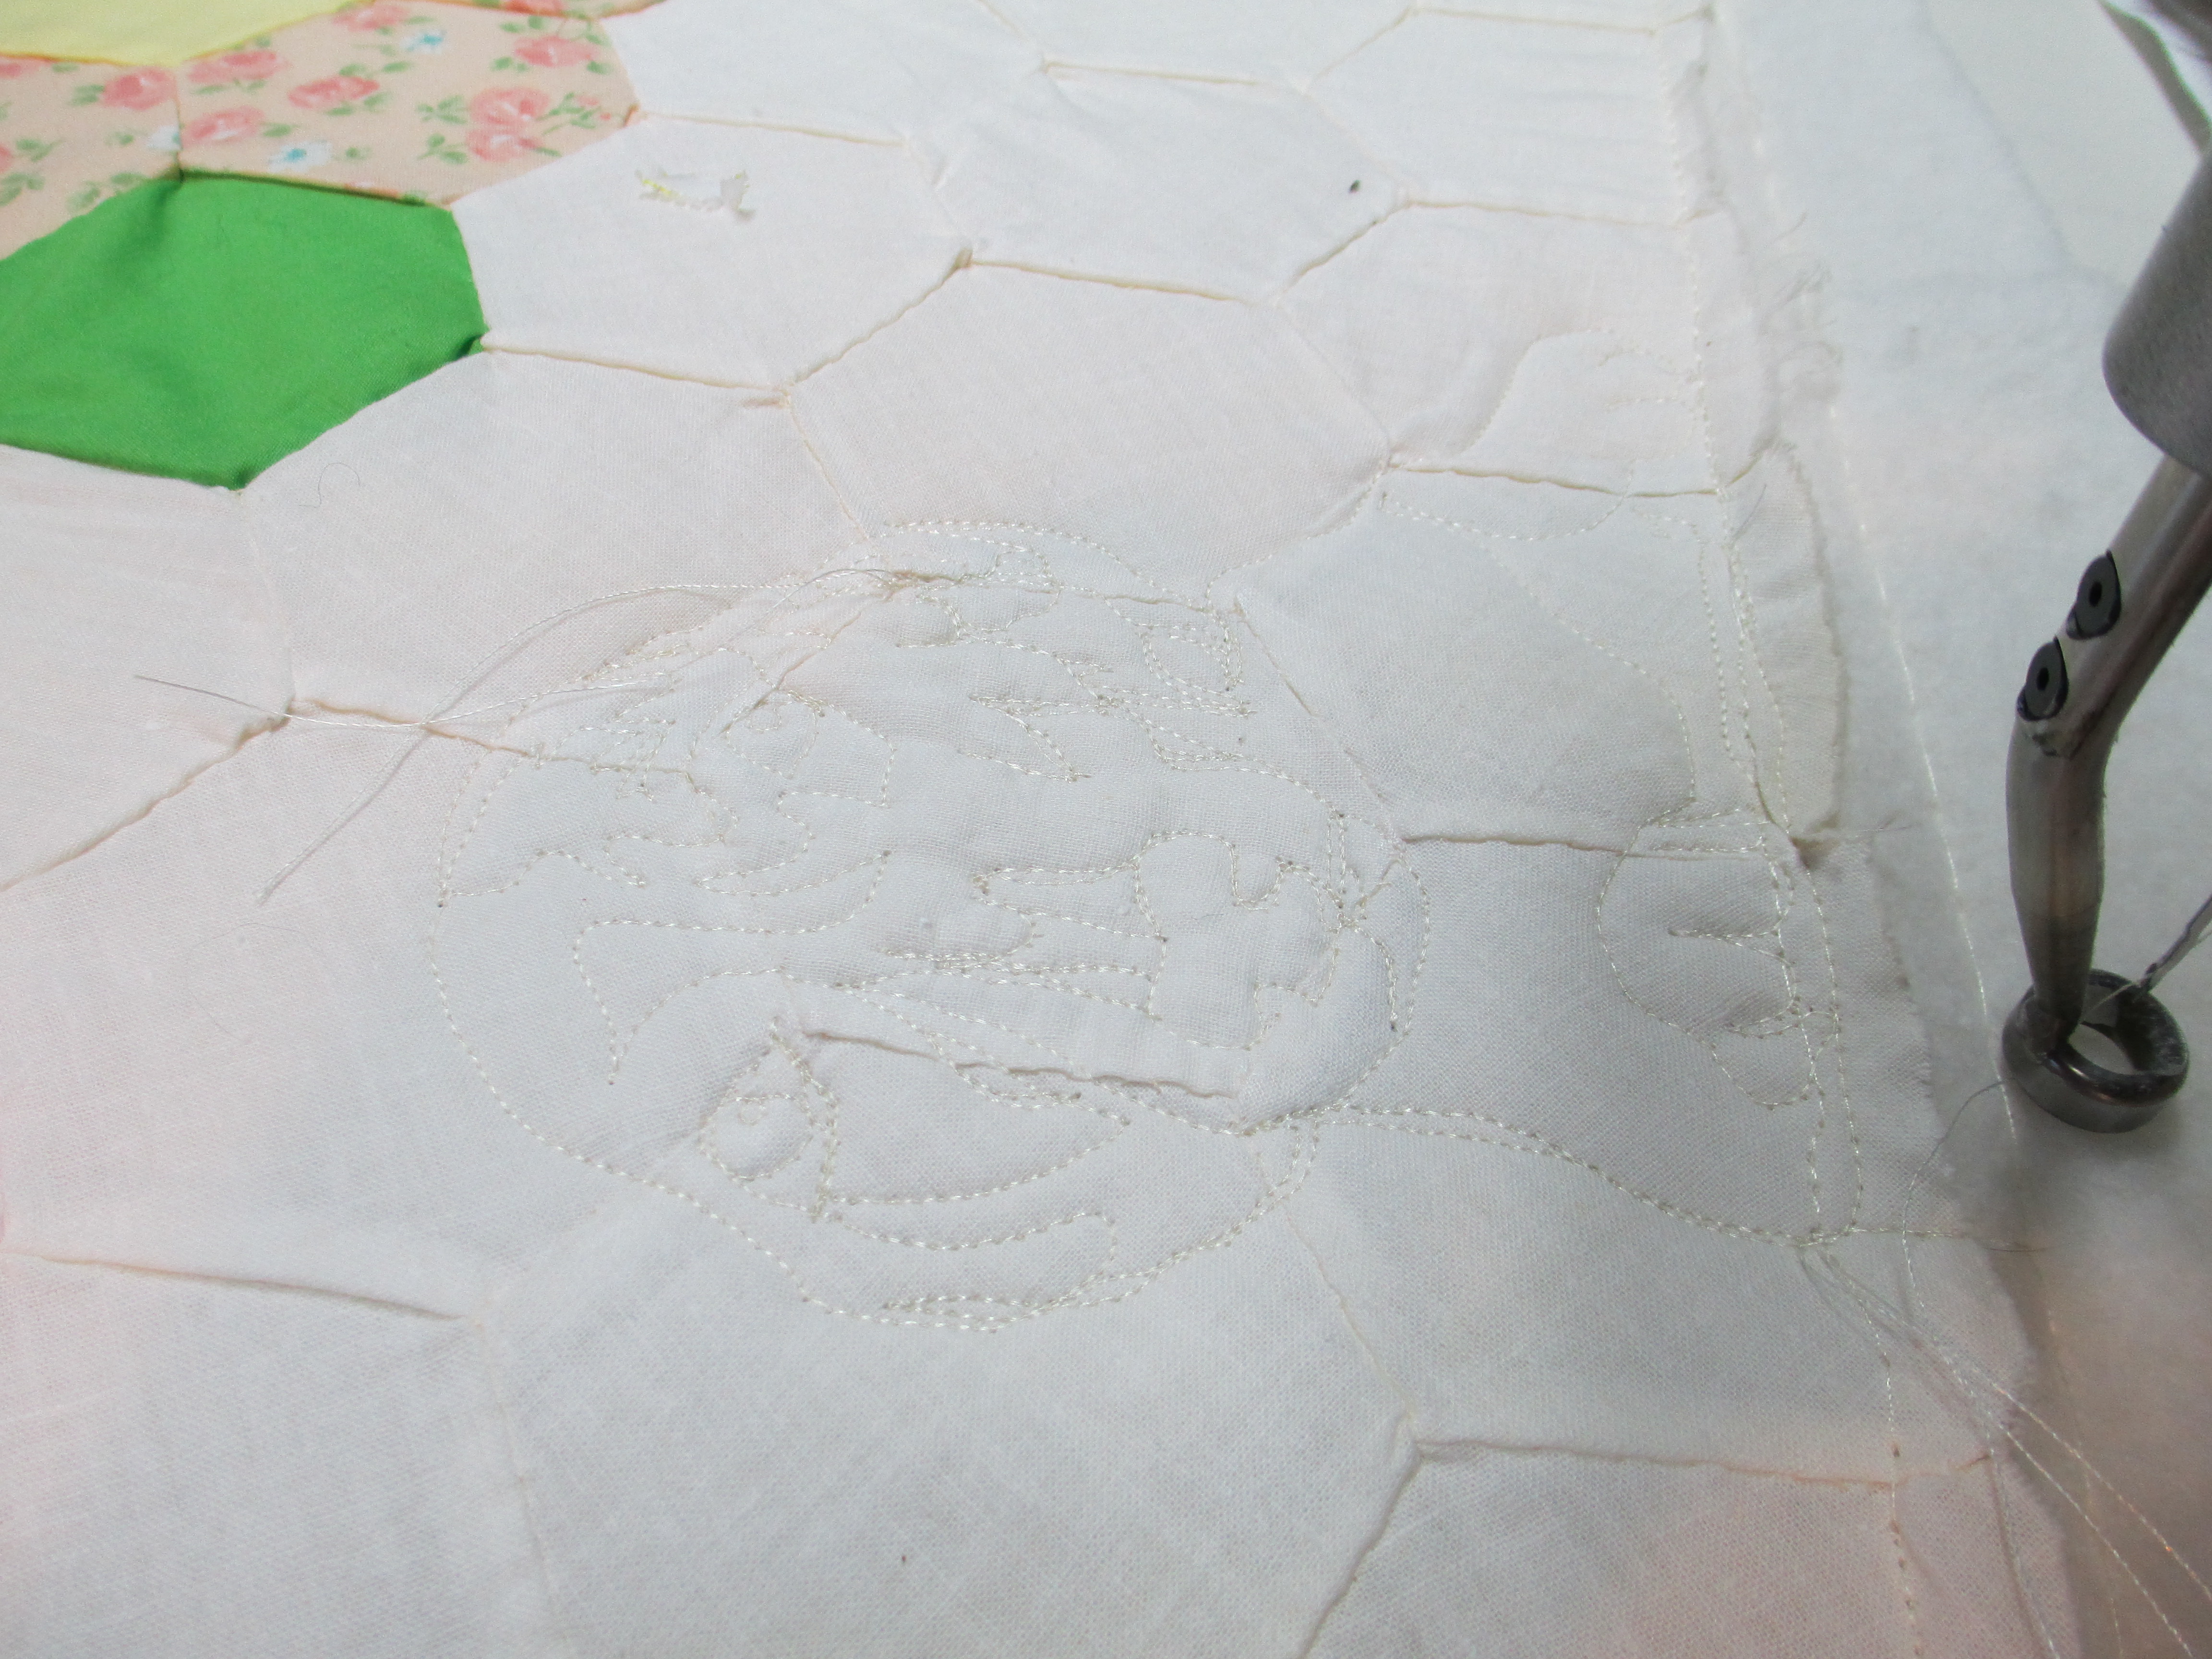
It’s not perfect, but it is one way for me to avoid marking on a quilt.
With the quilt I am working on right now, I am trying onion skin paper. I’ve tried tracing paper and vellum. Today I used the onion skin paper. I bought a roll of this from Du-All Art & Drafting Supplies. It’s 50 yards long, so hopefully it will last awhile. The cost, with shipping, was about $32.
The artist for this quilt wanted her applique to shine. She had twisted vines along 2 corners, leaving the opposite 2 corners blank. I could have quilted anything in there. A lot of people would have put feathers in there. Personally, I think feathers are sometimes over done. I love them, but I also love to see variety in quilting. So, I decided to use this quilter’s applique as the basis for the quilting motif along the blank corners. I figured that would better show off her applique. First I traced her design onto the onion skin paper.

Then, I adapted her design to fit into the empty corners, by folding the paper and creating new curls in the vines.

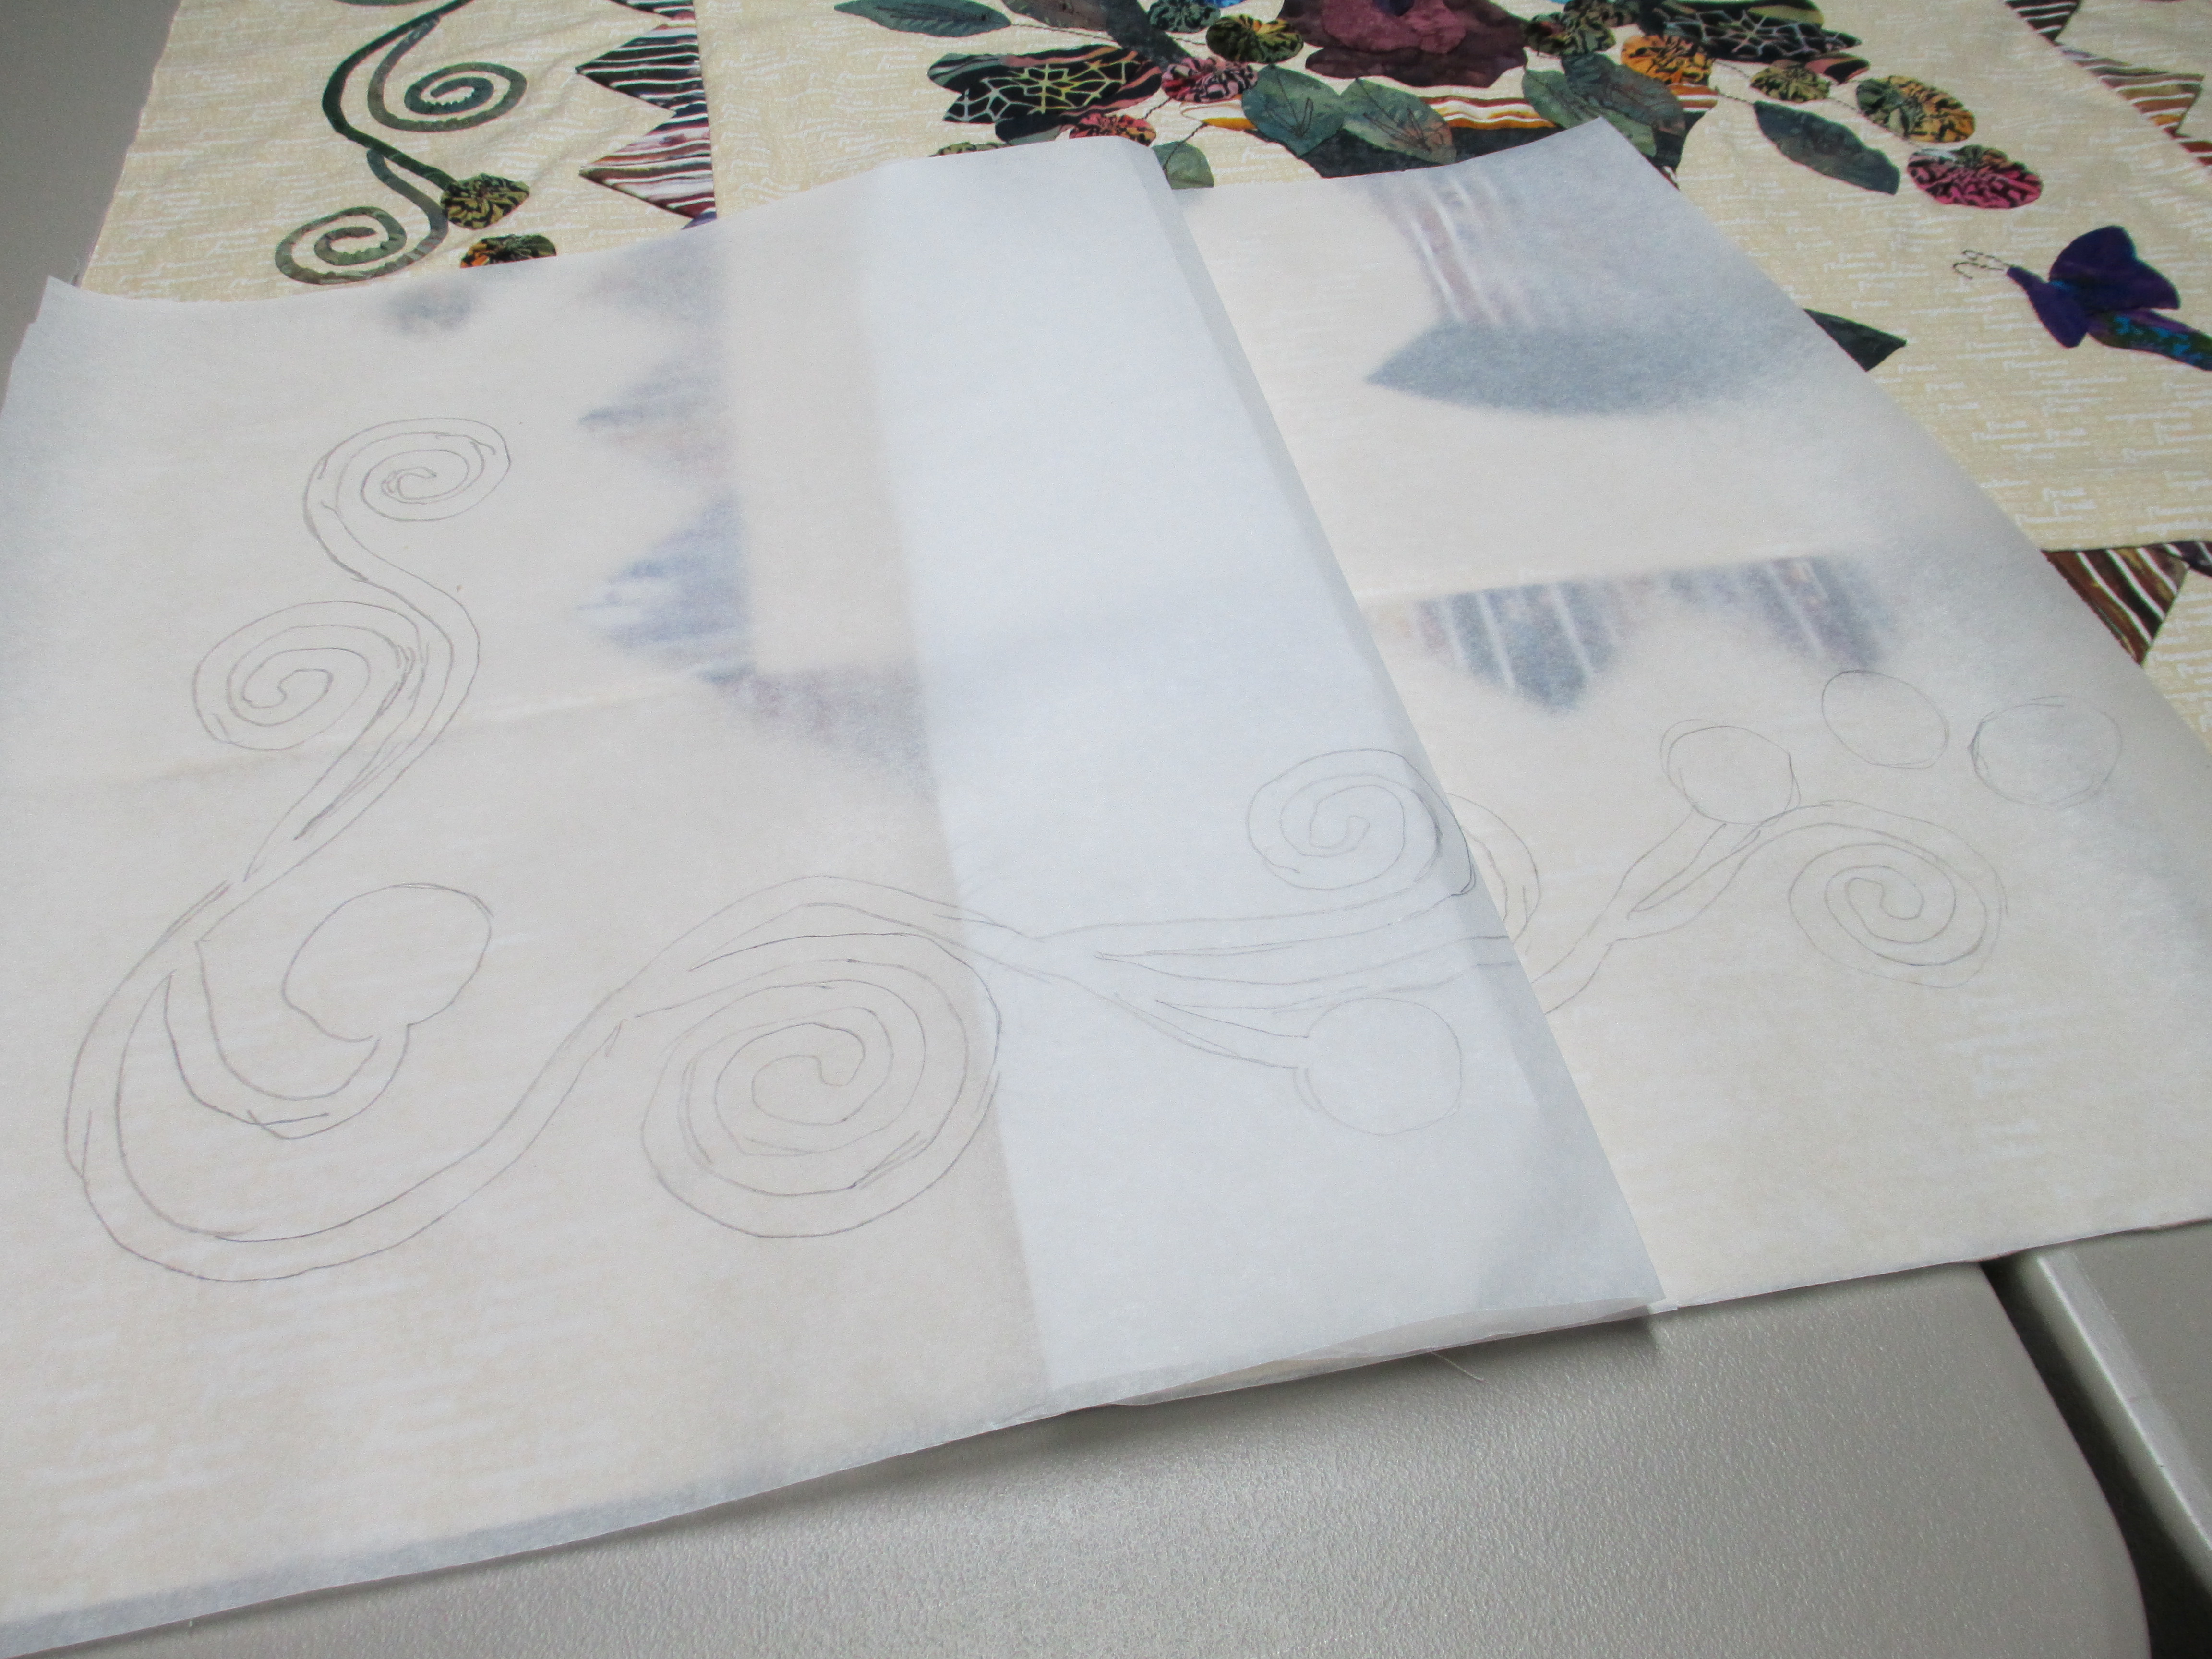
You can see here that the design is too long, so I will just take the vine from that curved corner and stretch it around to meet her appliqued vine (the area between my fingers).

Now I have the 2 corner vines drawn onto new paper and ready for quilting.

I’ve got it pinned onto the quilt and am ready to stitch-in-the-ditch (SID) around her appliqued vines and will stitch through the onion skin paper onto the quilt.

After I quilted through the paper and quilt sandwich, I ripped the paper off. It snapped off cleaner than both tracing paper and vellum. I like it! So, I think my preference between tracing paper, vellum, and onion skin paper would have to be the onion skin paper. Good thing I’ve got a 50 yard roll, because I’m sure I’ll be using it for future projects.
Stay tuned for pictures of the finished product in the near future! I’ll be filling in the area around the applique with stippling so it will pop!
Squaring-up Backing Fabric
For those of you who don’t quilt on a large quilting machine frame, it is extremely important that when you attach the quilt top to the frame, the first thing you do is to first makes sure the backing is squarely attached to the frame. Then the batting needs to be centered on that and then add the quilt top. Make sure the quilt top is squared up as much as possible and then keep it squared up as you unroll the top during the quilting process. But, like I said, MAKE SURE THE BACKING IS SQUARE! It’s the foundation for the finished quilt.
But, how on earth do you square up backing fabric that is 118″ wide? I ran into this problem recently and was met with a few problems. First off, you get the fabric folded up several times, and it’s not folded up enough for your 24″ ruler to span across. I felt very confident when I had added plenty of extra fabric and then cut the fabric. When I was ready to attach it to the leaders, this is what I found. Yikes!

So, how do I fix this? It is too wide for my ruler to fit across and too big for my multiple cutting mats, too, if I open up the fabric at all. So, I tried tearing across the fabric. Imagine my horror when I found this after ripping what I thought was the straight of grain! This messed with my whole belief system of what is true in the fabric world!

Can you believe there is that much leeway between the selvages? That’s about 9 inches. Needless to say, ripping the fabric was not going to work, and now I didn’t have enough fabric for the backing of the quilt.
I remembered my laser square and how I had used it to square up a finished quilt and also to make sure the quilt is square as it is on my quilting machine frame. I decided to at least try it, and I’m glad I did.


I lined up the laser with the selvage and then tried it to see how far across the top of the fabric it would go. The laser line hit the wall, so I was thrilled! The above pictures show the “too short” fabric, but I now had a strategy for squaring up all backing fabrics. I could shine the laser light across the fabric and run my ruler next to and along the line and cut straight lines along the laser line.
So, if you are a longarm quilter and you don’t already have a laser square, you might want to purchase one (or “borrow” your husband’s). It’s a small price to pay (they run from $30 to over $100) for fixing mistakes before they happen.
How to attach bias ends of binding
Since my old camera has gone to the camera cemetery, I bought myself a new camera. Yes, I had it on my Christmas wish list. In fact, I had the same camera in 3 different colors on my wish list (at highest priority), hoping someone would get me ANY of them. But, no. I don’t know if the THREE cameras threw them or what. It was a decent price! Really!
Anyhow, to make a long story short, I used my new camera to video tape myself sewing on the binding of one of my UFOs (UnFinished Objects) today. You might remember this little quilt (Letter Challenge). One of my quilt guilds was having a quilt challenge, and I wasn’t happy with the colors. Well, I didn’t get it done in time for “the reveal” of all the challenge quilts (I was too sick of it by then and still didn’t like the way it turned out), but I did finally finish it. I did a crappy job of quilting it, but at this point, it’s done. So, why not show you how I add my binding? I tried a new procedure, which I will share with you soon. For now, though, let me show you this video on YouTube. When I downloaded my videos, they saved into QuickTime, which I don’t normally use. So, I sent this one to YouTube so we could all see it. I warn you, though, I tried to zoom the camera in so you could see what I was doing. Unfortunately, there are a couple of spots where the camera is too close, because I’m moving things around, and you can’t see what I’m doing… you can only hear me. I had no help with the video taping, so I couldn’t see that it needed to be zoomed back out. Anyhow, I hope you learn something from this video, even if it’s just to zoom out a bit when you are taping. Go to http://www.youtube.com/watch?v=fPwrQKo1cHU&feature=youtu.be to watch it.
Waving at you!
Hello charity quilt that I’ve been avoiding for months now! In fact, it’s been about 4 months since I took you home to quilt. Yes, I’ve been busy with customer quilts, the raffle quilt, my birthday, my anniversary, Christmas, etc. but I finally did get to you. I’ve been avoiding you because I knew there would be issues with quilting you, and I wasn’t sure I could handle it, to be honest. Plus, with all the sampler blocks, I wasn’t sure just how I wanted to quilt you. I know, I know. Charity quilts are a GREAT way to practice and learn new skills. From the look of the next 2 pictures, I would say that some one was learning how to piece blocks. But, maybe not. Maybe the pen lines are there because that’s just how this person pieces together the blocks with more accuracy. Look closely and you will see lines marked on the blocks.


Charity quilts are typically made from fabric that is donated, so we don’t see too much quality fabric in charity quilts. That’s sad, too, because the charity quilts I typically quilt go to a shelter for abused women. They need something sturdy, yet soft, to hug them through their struggles. Most of the fabric in this quilt is fairly thin. The backing looks and feels like an old worn out bed sheet and is pieced in several places, but the seams are strong because they are serged. Problem is, this creates a bigger issue for the Longarm quilter. Not only does it mess with the hopping foot as it moves around to stitch, but it creates issues with how it lays on the quilting frame. You can see that from this next picture. See how the far end border kind of waves? That block in the upper left of the picture is called an “A” or “B” cup block (bra cup size). It will affect everything from the border to the rest of the quilt if it is not taken care of right away. That is the reason this row of blocks got quilted first.

Another angle so you can see it better. In this case, it’s not just the block (now shown in the upper right of the picture), but it is also the border. If you measure the border to fit the measurements of a wonky block, the borders are going to be wonky as well. Best practices for fixing this is to follow my tutorial on adding a border at https://cowtownquilts.wordpress.com/adding-borders-to-a-quilt-top-2/

As you can see, I quilted out the wavy border.

But then I got done with that row and rolled the quilt forward and found even more waves.

Yep, I quilted that out, too.

I thought I had it all under control. The wavy borders were now straight. Then, I got to the last row of blocks and…

If you look closely at the above picture, you will see that the grain line of blue and yellow fabric are at an angle, so the stretchy sides are attached to the sashing and borders. This is why it’s important to try to keep the straight of grain of the fabric next to the sashing and/or border. Of course, the problem floated down to the corner of the quilt. So, we’re not done with that wavy border, like we had thought.

A tip that I learned from Kim Brunner (www.kimmyquilt.com) was to stitch a straight line across the batting and backing at the top and the bottom of your quilt. Then, push the edge of the quilt top and bottom next to that line and baste a running stitch across to anchor it down straight. I do this at the top when I first start and at the bottom after I’ve quilted to the point where I can lift the fabric at the bottom of the quilt You can see the running stitch on the batting of this next picture. I’ll pin the top to match that line and will then stitch across it.

But, to make sure it is square at the corners (I don’t want the bottom to be wider than the top), I use a couple of strategies to square it up before I stitch the top down. In the picture below, you can see a right angle ruler at the corner of the quilt. I’ve got that stitching line to line up the ruler along the bottom. Since there’s not too much on the side of this one, I eyeball it to make sure the sides are straight.

You can see from the above picture that I’ve got another wavy border along the bottom. If you try to just stitch through it, you may end up with puckers so I pin as many pins as I need to make it lay flat.

And, I will make the top fabric a little more taut by “bending” it along the way.

If that’s not enough to “stretch” the fabric flat as I sew, I may put my fingers on both side of the base of my machine and will remove the pins as I go.
 \
\
Voila! The edge is no longer wavy.

But, I’ve still got that “B cup” blue and yellow block…

Okay. I’ll make sure my inner border is as straight as I can get it by Stitching in the Ditch (SID) along both sides. I have several tools to help me stitch in the ditch, but my personal favorite is Janet Lee’s Other Favorite Ruler. Little does she know, it’s my favorite, too! It’s wide enough for my big hands to fit around (3″) and long enough (12″) that I can aim it along a seam to straighten it out and stitch continuously longer than I can with other tools.

And, here is the rose colored border. I love how Brandy Lee (owner of The Quilting Place) does those swirly things in her borders and sashings, so I thought I would try it. I’ve got a lot of practice before I ace these! Go check out her work on Facebook at www.facebook.com/pages/The-Quilting-PlaceWhere-Quilts-Happen/108563672527385). Or go to her website at www.thequiltingplace.com. Like I said, I’ve got a long way to go before I’m as good as she is.

I put feathers in the yellow, outer border. If you look at this next picture, here is that blue and yellow block. It’s not completely flat, but it’s pretty dog gone close. I think as I quilt more and learn more, I will get better.

And, the finished product…

It doesn’t look so bad now after all, does it? I really did get lots of practice on this quilt and learned a lot. Hopefully someone will pick this quilt to snuggle up into and will end up loving it. And the quilt will have served its purpose of comforting and hugging the person wrapped in the safety of this warm quilt.
Hopefully this post has inspired you to make and quilt charity quilts, too.
Marking a Quilt using Press ‘n Seal
Remember that link I told you about awhile back where the blogger uses Press ‘n Seal to mark her quilts? Here is the link in case you need a refresher: http://quiltsbyrosemary.blogspot.com/2011/06/marking-quilting-pattern-using-pressn.html. Well, I decided to try it on my latest quilt.
I’ve been working on one of my quilt guild’s raffle quilt, or as they like to call it, the “2013 Opportunity Quilt.” I am letting the cat out of the bag here by posting pictures. I am nearly done and want to have it finished by our next meeting on December 4th. I just have a few more motifs to sew and a small border and then I can take it off the quilting frame, bind it, put a hanging sleeve and quilt label on it, and it’ll ready to be hung for “unveiling” at the December 4th meeting. As you will see from the pictures, it’s an Asian themed quilt, with kimonos all over it. I won’t put a picture on here yet of the whole thing, but will wait until after the official unveiling on the 4th for that.

I quilted interlocking circles along 3 borders. It was a little tedious trying to do that around applique Kanji (above, shown before quilting the interlocking circles), but necessary to make it look okay. Clam shells were quilted inside the kimono blocks and a different Japanese motif was quilted in the middle of each kimono. I won’t tell you too much about the kimonos, because I want to save that for the final unveiling pictures. But, I can post a picture of one of the kimonos.

I used the Press ‘n Seal that Rosemary suggested on the above block and the block pictured below. Here are a couple of pictures of the process.


I had already copied all my patterns onto vellum paper and am planning on using those in the same way, but I wanted to give the Press ‘n Seal a try on a small area before I try it on a larger area.
If you know anything at all about Judy Lyon, you know she does amazing things with pantographs. You can find her work here: http://www.meadowlyon.com/. When I saw her pantograph “Geisha Garden,” I knew I had to have it, and I wanted to add it into this quilt. But where? I already had the whole thing planned out, so the only place it would fit would be on the bottom border of the quilt. And, how on earth would I get it on there? Unless you are Matt or Bradie Sparrow, who can quilt a pantograph from the front of their machine using a BobbinCam http://www.youtube.com/watch?v=ZRDp2LZOPv8, then you need to come up with another way. Normally a pantograph is quilted from the back of the machine, so I would have to be VERY precise with how I did this. Plus, I had the quilt loaded to face the front of the machine, so that would mean taking the quilt off and reloading it the other direction. That’s when I decided to just draw the design onto the quilt, but that, too, would be difficult. I could use a roll of paper, but paper that is too big will get torn and mess up. So, Press ‘n Seal was the way to go with this. And, you know what? It worked really well!
Drawing it onto the Press ‘n Seal… See why I HAD to put this design into the quilt?

Pressing it down along the bottom border – it worked REALLY well and stayed in place the whole time.

After I ripped the plastic off…

The only “con” for this, I think, was that it took a little longer for me to pull the plastic off than it did for me to run the stitches over the Press ‘n Seal. Be careful of tiny little places where the plastic can get stuck. Try to either sew those closed or make them bigger, more open spaces.
Latest works

So, this is what I have been busy with lately. Mary made this quilt for her brother-in-law who needs a kidney transplant but, through a long and drawn-out process already, cannot seem to find a suitable donor. If any of you are willing to give up a kidney to help him, please contact me and I forward your information on to her. Mary chose straight line quilting for her modern quilt. I learned a ton from working on her quilt. The first problem I encountered was puckers in her flannel backing. The puckers ran along the seam lines of the quilt top. Well, I can’t have puckers, so I ripped those stitches out and chatted with a fellow quilter about what to do about those puckers. She said to raise the hopping foot on my longarm machine when working with flannel, thick batting, etc. Duh! If your hopping foot is smashing the layers as you try to travel along the quilt, it is only going to drag, warp, and pucker the fabric… AND your thread will constantly break, which happened to me. When it was all done, I was so glad to be able to quilt with flannel. I love the feel of it and think it makes a very comforting quilt, especially as a gift. Some people refuse to quilt with it, I found out, but I think I am going to go buy some flannel for my own quilts now. My whole idea of quilts and quilting is comfort; comfort for sleeping, comfort for your emotions and spirit, and warmth as you wrap your quilt around you in a hug.
The other issue I had was that I had ordered a cross-hatching ruler online and was waiting for it to arrive. I had tried using the other various rulers I have, and they worked fine, but, let me tell you, they did not work nearly as well as this one. I was surprised at how quickly the rest of the quilting went when I had this crosshatching ruler from Quilters Rule.

If you look closely, you will see the base of the ruler pushed against the roller bar on the left side of the picture. The ruler attaches to the base for straight line quilting. Now, it’s called a cross hatch ruler, but for modern quilts with straight lines, this is the perfect tool for the job and worth every penny. Believe me, this simplified the job of stitching at an angle on a longarm so much! If you don’t already have one for your quilting business, I highly recommend buying one! Check them out at: http://www.quiltersrule.com/template/mqt-chr.html
The other quilt I’ve been working on was made by Barbara with jelly roll fabric. She is giving it as a gift to her daughter-in-law for Christmas and wanted the family names and personal notes written on it. Can you see the writing in this picture?

Even her backing fabric is cute and goes well with the chartreuse thread she chose.

So, now that I’ve got those done, it’s back to the Opportunity Quilt that I need to finish. I am working at our guild’s quilt show later this week, so I’d better get busy.
Wonders of magnets
I have a magnetic bracelet that my sister gave me to wear for a troublesome wrist. Surely you’ve heard the stories of how these bracelets are supposed to help ailments, aches, and pains. Well, magnets are also well known for attracting metals.
Here you can see that magnetic bracelets can help “attract” loose pins.

Now that can be a bad thing, if you are not careful, because you can get stuck. But… it can also be a good thing; handy for picking up pins without having to stop and get your magnetic bowl. You be the judge… Good thing? Or, bad thing?
Traveling Pin Cushion
I saw this blog showing how to make a traveling pin cushion and thought, “What a good idea!” http://www.rileyblakedesigns.com/cutting-corners/2012/08/03/traveling-pincushion/ This is soooo cute. For us lazies who are okay with a plain cushioned top over a container, though, this can be adapted. You could probably get one of those paper boxes at a craft store, cover it with fabric and then cushion the lid. You could also attach a pin holder to the inside of the lid. It would safely keep your items together and would be great for us who like to do handwork while we are out or traveling.
